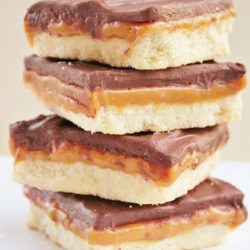
Homemade Twix Bars
These Homemade Twix Bars will satisfy your Twix cravings, but also become a crowd favorite dessert recipe with the shortbread, caramel, and chocolate layers!
Prep Time 20 minutes
Cook Time 30 minutes
Resting Time 45 minutes
Total Time 50 minutes
Servings 24 bars
Ingredients
- 1 cup salted butter softened
- 1 cup powdered sugar
- 2 tsp. vanilla extract
- 2 cups all-purpose flour
- 2-1/2 cups caramel squares
- 3 Tbsp. heavy cream
- 3 cups chocolate chips
- 1 Tbsp. vegetable shortening Optional
Instructions
-
For the crust:
-
Preheat oven to 300 degree Fahrenheit.
-
Spray a 9x13 in pan with cooking spray, or line with parchment paper. Set aside.
-
In a medium-sized bowl, beat together the butter, sugar, and vanilla.
-
Add the flour - at first the mixture may seem dry, but will come together quickly.
-
Take the dough and press it evenly into the pan. (Lightly flouring your fingertips will help with any sticking.)
-
Prick the crust all over with a fork - this allows steam to escape so the crust will bake evenly with fewer bubbles.
-
Bake until lightly golden brown on top and edges - about 30-35 minutes.
-
Remove from the oven and immediately run a knife around the edges to loosen the crust. Set aside to cool completely.
-
For the caramel layer:
-
Melt the caramel and cream in a small saucepan over low heat.
-
Pour the caramel over the cooled crust and set in the refrigerator for 30 minutes to firm up.
-
For the chocolate layer:
-
Melt the chocolate in the microwave using ten second increments - stirring every time.
-
If the chocolate seems too thick, add a tablespoon of shortening to thin it. (Just know that this will leave your end-resulting chocolate a little softer than normal. I don't use it for this very reason. )
-
Pour evenly over the chilled caramel layer and spread until it covers the entire surface.
-
Return to the refrigerator (or freezer) until the chocolate is well set.
-
Cut and serve.